
How To Apply LUTs
in Final Cut Pro
The complete guide to applying LUTs in Final Cut Pro — Custom LUT effects, Camera LUTs for log footage, bulk-installing .cube files, adjusting intensity, and applying LUTs to multiple clips at once.
To apply a LUT in Final Cut Pro, select your clip, press ⌘ + 5 to open the Effects browser, click Color in the sidebar, and drag Custom LUT onto the clip. Then press ⌘ + 4, open the LUT menu in the Video Inspector, choose Choose Custom LUT…, and pick your .cube file. If the look is too strong, lower the Mix slider. Log footage is different: set a Camera LUT in the Info Inspector first.
- Select the clip in the timeline
- Open the Effects browser —
⌘ + 5→ Color → drag Custom LUT onto the clip - Open the Inspector —
⌘ + 4→ LUT menu → Choose Custom LUT… → pick your .cube - Too strong — lower the Mix slider
- Log footage — Info Inspector → Camera LUT first
- Multiple clips — copy the graded clip, select the rest,
⌥ + ⌘ + Vto Paste Effects
A LUT (look-up table) is a file that remaps the colors in your footage, so one file can change the whole mood of a clip in a click. It can save you a lot of time compared with grading by hand, though it won't fix a badly exposed shot.
In Final Cut Pro there are two different ways to apply one, and using the wrong one on the wrong footage is the most common beginner mistake. If you also work in DaVinci Resolve, our guide to colour grading in DaVinci Resolve covers the same correct-then-grade idea.
Two Kinds of LUT
| Type | What it does | Where you apply it |
|---|---|---|
| Technical LUT | Converts log or wide-range footage (S-Log3, C-Log3 and similar) to a standard color space like Rec. 709. Flat, grey-looking footage needs this first. | Info Inspector → Camera LUT |
| Creative LUT | Adds a look: a film emulation, a warm grade, a desaturated tone. It works best on footage that's already neutral. | Effects browser → Custom LUT |
Correct first, then grade. Convert log footage with a technical LUT, balance exposure and white balance, then apply your creative LUT on top. A creative LUT applied straight to log footage usually looks wrong.
Final Cut Pro on a Mac and a LUT in .cube format. The Custom LUT effect is built in, so no plugins are needed. I used Final Cut Pro 11.2 for this tutorial. The Custom LUT effect has been available since Final Cut Pro 10.4.4. So this tutorial should work fine in Final Cut Pro 10.5 and later versions on macOS.
The Custom LUT Effect
This is the primary method for applying a creative LUT to any clip in your Final Cut Pro timeline. Custom LUT works like any other clip effect, so you can remove it, reorder it or adjust it later without touching your footage. Apple covers the same workflow in its guide to applying LUTs in Final Cut Pro.
Click the clip in the timeline.
Press ⌘ + 5, or click the Effects button in the toolbar, then click Color in the sidebar.
Drag Custom LUT onto the clip, or double-click it while the clip is selected.
Press ⌘ + 4 and stay on the Video tab. Scroll to the Custom LUT section.
Open the LUT menu, choose Choose Custom LUT…, find your .cube file and click Open.
Drag the Mix slider down if the look is too heavy. 100 is full strength and 0 shows the original footage.
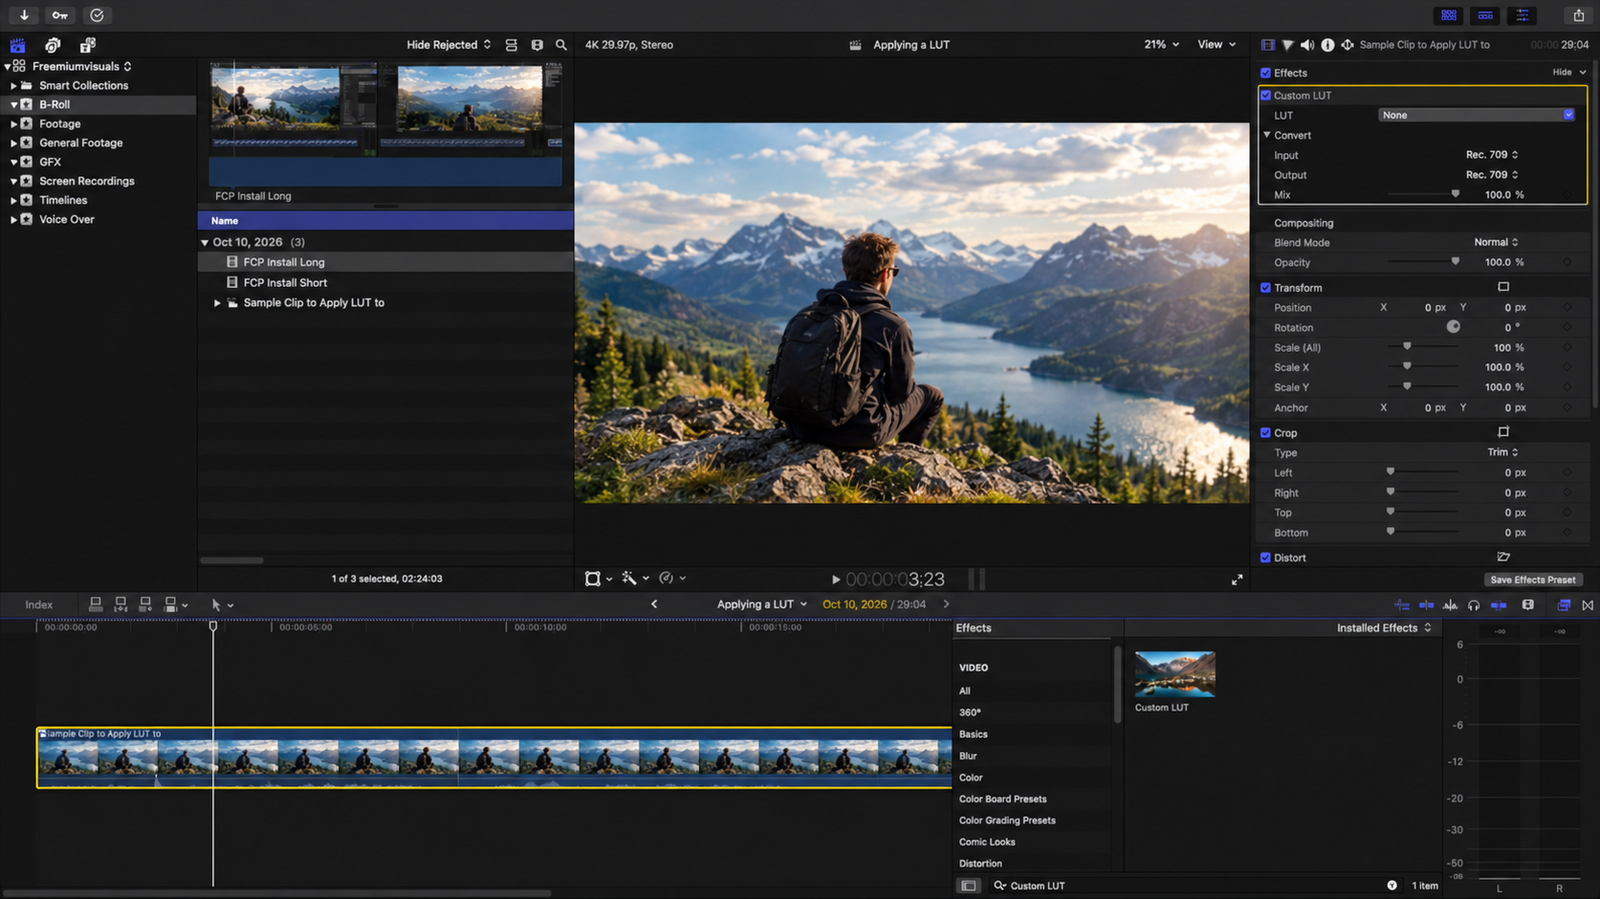
When the file browser opens after Choose Custom LUT…, you may be able to select a whole folder of LUTs instead of a single file. If that works in your version, the folder's contents appear in the LUT menu so you can switch between them without browsing again.
Camera LUTs for Log Footage
Camera LUTs are applied to the media itself from the Info Inspector, not from the Effects browser. When you import log footage, Final Cut Pro often detects the format from the file's metadata and applies the matching Camera LUT for you. But when that automatic detection fails — for example, when the camera doesn't embed metadata, or footage looks flat — you'll need to apply or switch the Camera LUT manually.
Click the log footage clip you need to correct. Camera LUTs apply at the media level — selecting the clip in either the timeline or the Media Browser works.
Press ⌘ + 4, then click the Info tab at the top of the Inspector.
Look for the Camera LUT menu. It shows the LUT currently applied, or None if nothing was detected.
Choose the built-in LUT that matches your camera's log format, or add a custom .cube from the same menu if your camera maker supplies one.
A Camera LUT applies to the media before any clip effects. A Custom LUT is a clip effect that sits in the effects stack. Don't apply a log-conversion LUT as a Custom LUT effect, because the order of processing will be wrong and the footage will look off.
Install LUTs Permanently
You can keep your LUTs in Final Cut Pro's own Custom LUTs folder, so they're in the menu in every project without browsing for files each time.
Apply Custom LUT to a clip, open the LUT menu in the Inspector, and choose Reveal in Finder. That opens the Custom LUTs folder.
In Finder press ⇧ + ⌘ + G and enter ~/Library/Application Support/ProApps/Custom LUTs.
Drop them into the folder, then reopen Final Cut Pro if they don't appear in the LUT menu straight away.
Video Tutorial
Prefer to watch? This video shows how to apply LUTs in Final Cut Pro.
Adjusting LUT Strength
A LUT at full strength often looks over-processed on real footage. Select the clip, open the Video Inspector, and drag the Mix slider in the Custom LUT section to the left until the look sits naturally. Somewhere between 60 and 80 is a reasonable place to start, but every LUT and every clip is different, so judge it by eye. Click the number to type an exact value if you want clips to match.
Use Mix for strength, not the clip's Opacity. Opacity makes the whole clip, with every effect on it, more transparent, which isn't what you want here.
LUTs on Multiple Clips
Manually applying a LUT to every clip in a long timeline is unnecessary. Final Cut Pro's Paste Effects command copies an entire effect stack — including the LUT, its specific file selection, and the Mix intensity — across as many clips as you select in a single step.
Set the LUT file and Mix on a reference clip.
With that clip selected, press ⌘ + C.
Hold ⌘ and click each one, or click the first and ⇧-click the last for a range.
Press ⌥ + ⌘ + V, or choose Edit → Paste Effects.
Paste Effects copies every effect on the reference clip, not only the LUT. If you've added other effects to it, remove them first or they'll be pasted too.
How To Apply LUTs in Final Cut Pro — Workflow Best Practices
| Task | Recommended Approach | Why It Matters |
|---|---|---|
| Order of operations | Technical LUT first → Color correction → Creative LUT on top | Applying creative grades to uncorrected log footage gives unpredictable results |
| LUT intensity | Start at 65–80% Mix, adjust per clip | Full-strength LUTs frequently look over-processed on real footage |
| Log footage | Use Camera LUT via Info Inspector, not Custom LUT effect | Processing order matters — Camera LUTs apply before any clip effects |
| Multiple clips | Configure one clip → Copy → Paste Effects (⌥⌘V) | Maintains exact LUT selection and Mix value across all target clips |
| Managing large LUT libraries | Organise into subfolders inside the Custom LUTs directory | Subfolders appear as categories in the LUT dropdown for faster browsing |
| Previewing before committing | Upload a test clip as Unlisted and check across devices | LUTs can look different after platform compression — always preview first |
A LUT can't rescue an underexposed or badly white-balanced shot, and it can make those problems worse. Balance the clip before you apply a look. If your source is soft or low resolution, it may help to upscale it before you grade.
When It Doesn't Work
My LUT isn't in the menu after I copied it in
Quit and reopen Final Cut Pro. If it still isn't there, check that the file is in .cube format and sits in the Custom LUTs folder, not inside a folder that wasn't loaded.
I can't find the Custom LUT effect
Look under Color in the Effects browser sidebar, or search for "Custom LUT" in the search box. If it isn't there, check for a Final Cut Pro update in the Mac App Store.
The footage looks wrong after applying the LUT
Two common causes. First, a log-conversion LUT may have been added as a Custom LUT effect instead of a Camera LUT, so remove the effect and set the Camera LUT in the Info Inspector instead. Second, a creative LUT may have been applied to log footage that wasn't converted or balanced first. Convert and correct the clip, then reapply the look and lower the Mix.
How do I remove a LUT from a clip?
Select the clip, open the Video Inspector, select the Custom LUT effect and press Delete. To clear all effects from a clip at once, use Edit → Remove Effects.
Can I stack more than one LUT on a clip?
You can add Custom LUT to a clip more than once and give each a different file and its own Mix. Check the order in the Inspector, since each effect works on the result of the one before it.
My LUT is in a different format
.cube is the format to use. If your LUT is in another format, convert it to .cube with a LUT converter before bringing it into Final Cut Pro.
Final Recap
Use Custom LUT from the Effects browser for creative looks and Camera LUT in the Info Inspector for log footage. Keep your .cube files in the Custom LUTs folder, control strength with Mix, and use Paste Effects to match a grade across clips. Always correct before you grade.

Hi there! I’m Titto, the creative mind behind FreemiumVisuals. As a designer come digital artist with 10 years of experience, I’ve always been obsessed with creating high-quality visuals.
This blog is my passion project to help creators like you master tools, hacks, and resources that blend affordability with professional results. Whether you’re a hobbyist or a freelance editor, you can utilize this website as your one-stop destination for the latest AI design tool reviews and software tutorials.
Let’s Connect!
📧 Email: [contact@freemiumvisuals.com]
Got a question or idea? Drop a comment on my latest post!